

The Complete Guide to Running Starlink Mini on 12V: Adapters, Kits and Setup
Everything you need to power your Starlink Mini from a vehicle battery, portable power station, or off-grid setup-without the complexity of inverters.
Last updated: March 2026
If you're planning to run Starlink Mini in your caravan, 4WD, boat, or off-grid setup, you've probably discovered that the standard power brick needs mains power. The good news? Starlink Mini was designed from the ground up to run on DC power, and with the right 12V adapter or conversion kit, you can tap directly into your vehicle's electrical system.
This guide is maintained by Dishy Mini Mounts, Australia's specialist Starlink Mini 12V power solutions provider. We manufacture step-up converters, Anderson plug cables, and complete 12V kits — all designed and made in Australia.
Ready to buy? Browse our complete range of Starlink Mini 12V Cables & Adapters →
This guide covers everything: how Starlink Mini handles power, the three main approaches to 12V operation, which products suit different setups, and how to avoid the voltage drop issues that catch out many travellers.
Understanding Starlink Mini's Power Requirements
Before choosing a 12V adapter, it helps to understand what's actually happening inside your Starlink Mini.
The Numbers That Matter
Starlink Mini accepts a wide DC input range of 12V to 48V. That's unusually flexible-most electronics require a specific voltage. However, there's a catch that trips up many users.
During startup, the Mini's phased array antenna needs approximately 60W of power as it initialises, searches for satellites, and establishes connection. Once online, consumption drops to a typical 17-20W during normal operation.
Here's where the maths matters: Power (watts) = Voltage × Current. At 12V, that 60W startup requires 5 amps. But vehicle batteries don't always deliver a clean 12V-especially when the engine is off, the battery is partially discharged, or you're running other accessories.
The Voltage Sag Problem
A "12V" vehicle system actually operates across a range:
- Engine running: 13.5V–14.4V (alternator charging)
- Engine off, battery full: 12.6V–12.8V
- Battery partially discharged: 11.5V–12.2V
- Under load: Can drop below 11V
When voltage drops, current must increase to deliver the same power. At 11V with a 60W load, you need nearly 5.5 amps-and that's assuming no losses in cables or connections. This is why some travellers report their Starlink Mini working perfectly while driving but struggling to boot when parked overnight.
Warning: Works while driving but not when parked? Your alternator provides 13.5-14.4V while running, but battery voltage drops when the engine is off. This is the single most common 12V power issue.
Three Approaches to 12V Starlink Power
There's no single "best" solution-the right approach depends on how you use your Starlink Mini. Here are the three main options.

Option 1: Direct 12V Connection
Best for: Driving use, short sessions, setups with healthy batteries
Direct 12V cables connect your Starlink Mini straight to a cigarette lighter socket, battery terminals, or Anderson plug outlet. They're simple, affordable, and work well when your electrical system maintains good voltage.
Pros:
- Simplest installation-often plug-and-play
- Lowest cost ($25–$60)
- No additional electronics to fail
- Most efficient when voltage is adequate
Cons:
- May struggle to boot when battery voltage sags
- Not ideal for extended stationary use
- Long cable runs increase voltage drop
When to choose direct 12V: You primarily use Starlink while driving (alternator keeps voltage high), have a quality lithium battery system, or only run short sessions before moving on.
Option 2: Step-Up Converter (Boost Converter)
Best for: Stationary camping, extended use, long cable runs, older or smaller battery systems

A step-up converter takes your 12V input and boosts it to a higher voltage-typically 20V, 24V, 30V, or 36V. This gives Starlink Mini more voltage headroom, ensuring reliable startup even when your battery is less than fully charged.
Pros:
- Reliable boot even with lower battery voltage
- Handles voltage sag gracefully
- Compensates for losses in longer cable runs
- Set-and-forget reliability
Cons:
- Slightly higher cost ($49–$126)
- Additional component in the system
- Small efficiency loss in conversion (typically 90–95% efficient)
When to choose a step-up converter: You camp for multiple nights without driving, run cable lengths over 5 metres, have an AGM or older lead-acid battery, or simply want guaranteed reliability regardless of conditions.
Option 3: Power Tool Battery Adapter
Best for: Portable setups, sheds, temporary locations, backup power

If you own Milwaukee, Makita, Ryobi, or DeWalt power tools, you can run Starlink Mini directly from your existing 18V/20V batteries. These adapters are perfect for quick deployments where you don't want to rely on vehicle power.
Pros:
- Completely portable-no vehicle connection needed
- Uses batteries you already own
- Perfect for sheds, job sites, or remote work locations
- 18V–20V output is in Starlink's ideal range
Cons:
- Runtime limited by battery capacity (typically 2–6 hours per battery)
- Need to swap batteries for extended use
- Batteries themselves aren't included
When to choose power tool adapters: You need portability, want a backup power option, are setting up in a shed or temporary location, or already have a collection of compatible power tool batteries.
For a detailed comparison of Milwaukee adapter options, see our Milwaukee Starlink Mini Adapter Guide.
What's in a 12V Starlink Kit? Essential Components
Whether you buy a complete kit or build your own setup, here are the components that make up a working 12V Starlink installation.
Power Source Connection
How you tap into 12V power depends on your setup:
- Cigarette lighter plug: Simplest option, uses existing socket. Limited to around 10A (120W) on most vehicles. Ideal for temporary setups.
- Anderson plug: Australian standard for caravan and 4WD auxiliary power. Lower resistance than cigarette sockets, handles higher current reliably. Best for permanent installations.
- Battery terminals: Direct connection via ring terminals or bolt-on connectors. Lowest resistance, highest reliability. Requires basic wiring.
The DC Barrel Connector
Starlink Mini uses a DC5521 barrel jack-a 5.5mm outer diameter, 2.1mm pin connector. This is the same connector used on many consumer electronics, which is why the aftermarket has so many compatible accessories. When shopping for cables, ensure they specify DC5521 compatibility.
Fuse Protection
Any quality 12V adapter includes inline fuse protection, typically 10A–15A. This protects both your Starlink Mini and your vehicle's electrical system from shorts or overcurrent situations. Never bypass or remove fuses-they're your safety net.
Step-Up Converter (Optional but Recommended)
If you're going the step-up route, you'll need a DC-DC boost converter rated for at least 60W continuous output. Common output voltages are:
- 20V: Budget-friendly, adequate headroom for most situations
- 24V: Good balance of efficiency and reliability
- 30V: Recommended-matches Starlink's standard power supply voltage
- 36V: Maximum headroom, handles worst-case voltage sag
Choosing the Right 12V Solution: A Decision Guide
Still not sure which approach suits your setup? Work through these questions.
How Do You Primarily Use Starlink?
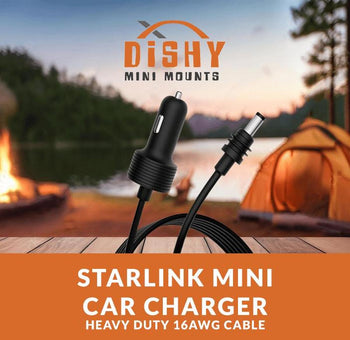
Mostly while driving or for short stops: A simple 12V direct cable is your best bet. See our guide to running Starlink in a car for the full setup breakdown. The Basic Car Charger ($25) handles most driving scenarios, or upgrade to the Heavy Duty 16AWG version ($39) for lower voltage drop on longer runs.
Extended stationary camping: A step-up converter provides the reliability you need. The 30V Step-Up ($75) is our "set and forget" recommendation-108W capacity provides 48W headroom over the Mini's startup requirement.
Mix of both: Consider starting with a direct cable and adding a step-up converter later if you experience boot issues during stationary use.
What's Your Cable Run Length?
Under 5 metres: Direct 12V works well. Voltage drop is minimal over short runs with quality cables.
5–10 metres: Consider heavier gauge cables (16AWG vs 18AWG) or a step-up converter to compensate for losses.
Over 10 metres: Step-up converter strongly recommended. Long cable runs compound voltage drop issues, especially under load.
What's Your Battery Setup?
Lithium (LiFePO4): Maintains voltage well under load. Direct 12V often works reliably, though step-up provides extra insurance.
AGM or Lead-Acid: Voltage sags more significantly under load and at partial discharge. Step-up converter recommended for reliable operation.
Do You Need Portability?
Vehicle-mounted only: Cigarette lighter or hardwired solutions suit you.
Need to move between vehicles/locations: Anderson plug connections let you quickly disconnect and reconnect.
Completely portable: Power tool battery adapters let you run Starlink anywhere without vehicle power. Try our runtime calculator.
Installation Tips for Reliable 12V Operation
Once you've chosen your 12V solution, these tips will help ensure reliable operation.
Minimise Voltage Drop
Every connection, switch, and metre of cable adds resistance and drops voltage. To minimise losses:
- Use the shortest cable run practical for your setup
- Choose heavier gauge wire (lower AWG number = thicker wire) for longer runs
- Ensure all connections are clean and tight
- Anderson plugs have lower contact resistance than cigarette sockets
Position Your Converter (If Using One)
Install step-up converters where they'll stay cool and dry. They generate some heat during operation, so ensure adequate airflow. Most units are splash-resistant but not waterproof-keep them inside the vehicle or in a protected enclosure.
Tip: Mount your step-up converter where it stays cool and dry with adequate airflow. They generate heat during operation - don't bury them under carpet or in sealed compartments.
Add a Switch for Convenience
A power switch lets you reboot Starlink Mini without unplugging cables. This is useful for troubleshooting and prevents unnecessary wear on connectors. Many DMM cables include built-in switches, or you can add a rocker switch kit to your installation.
Check Your Fuse Rating
Match your fuse to your cable capacity, not just the load. A 10A fuse suits most Starlink Mini installations. Using an oversized fuse defeats the protection-if a fault occurs, the cable could overheat before the fuse blows.
Troubleshooting Common 12V Issues
Starlink Won't Boot on 12V
Symptom: App shows "Unplugged" or dish doesn't initialise, but works fine on mains power.
Likely cause: Insufficient voltage reaching the dish during startup.
Solutions:
- Check battery voltage under load-if below 12V, charge before use
- Run the engine to boost voltage while Starlink initialises
- Move to a step-up converter for more voltage headroom
- Check for voltage drop in cables-feel for warm spots indicating high resistance
For more detailed troubleshooting steps, see our Starlink Mini Won't Activate guide.
Boots Successfully but Drops Connection
Symptom: Starlink starts up but periodically disconnects or reboots.
Likely cause: Voltage fluctuations or intermittent connections.
Solutions:
- Check all connections are secure
- Look for damaged cables or worn connectors
- If using a cigarette socket, try cleaning the contacts or switching to Anderson connection
- Consider a step-up converter to smooth out voltage variations
Works While Driving, Fails When Parked
Symptom: Perfect operation with engine running, problems when stationary.
Likely cause: Reliance on alternator voltage that's absent when parked.
Solutions:
- Your direct 12V setup needs alternator-level voltage to work reliably
- Upgrade to a step-up converter for stationary use
- Ensure your auxiliary battery is adequately charged before extended stationary sessions
This is one of the most common mistakes we see-read more in 7 Mistakes Every Caravan Traveller Makes.
Recommended 12V Products
Based on thousands of Australian installations, here are our most reliable options for each scenario.

For Driving and Short Stops
Basic Car Charger (3m) - $25
Our best-seller for good reason. 18AWG wire, 15A fuse protection, plug-and-play simplicity. Perfect for travellers who primarily use Starlink while moving or during short lunch stops.
Heavy Duty 16AWG Car Charger - $39
Thicker 16AWG wire reduces voltage drop, especially useful if your cigarette socket is located far from the battery. Worth the upgrade for larger vehicles.
For Extended Stationary Use
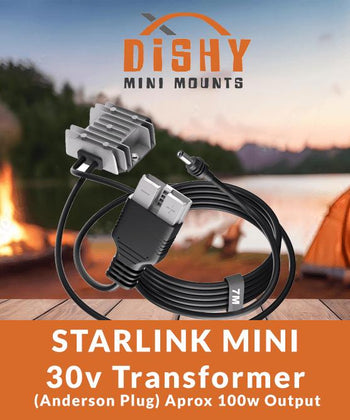
30V Step-Up Converter - $75
Our "set and forget" recommendation. 108W capacity provides 48W headroom over startup requirements. Works reliably even when battery voltage sags to 10V. Cigarette plug input.
30V Step-Up with Anderson (7m) - $95
Same reliable converter with 7m attached DC cable and Anderson plug input. Perfect for caravans with Anderson power outlets. Generous cable length suits most installations.
For Anderson Plug Systems
Anderson Cable Bundle - $57
Anderson to DC female adapter with 10A inline fuse, plus 2m DC male-to-male cable. Direct 12V for setups with good voltage.
Ultimate Anderson Bundle - $126
Complete kit with 36V step-up converter, Anderson input, and all necessary cables. Maximum reliability for serious off-grid touring.
For Power Tool Battery Users
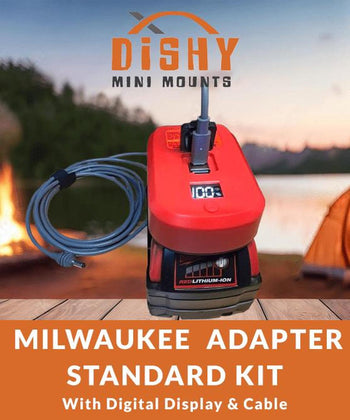
Milwaukee 18V Adapter - $36
Simple adapter runs Starlink Mini from M18 batteries. Expect 3–6 hours runtime depending on battery capacity. On/off switch included.
Makita 18V Adapter - $36 | Ryobi 18V Adapter - $36 | DeWalt 20V Adapter - $36
Same concept for other major power tool brands. Use the batteries you already have.
Shop Dishy Mini Mounts
Everything in this guide is backed by products we design and manufacture right here in Australia. Dishy Mini Mounts is the leading Australian Starlink Mini accessories brand — trusted by thousands of travellers, off-gridders, and mobile workers across the country.
- Starlink Mini Mounting Kits — magnetic mounts for any vehicle or surface
- 12V Power Cables and Adapters — Anderson plugs, step-up converters, DC extension cables
- Dishy Armour Protective Cover — hail and impact protection
Frequently Asked Questions
Related Guides
Once your 12V power is sorted, these guides will help you get the most from your Starlink Mini setup:
- The Complete Starlink Mini Setup Guide - Everything the manual doesn't tell you
- Starlink Mini Cable Selection Guide - Choose the right cable length and type
- Vehicle Mounting Guide - Magnetic mounts, roof racks & cable routing
- Milwaukee Adapter Guide - Basic vs Standard vs Ultimate kits compared
- 7 Mistakes Every Caravan Traveller Makes - Voltage drop, cheap cables & more
- Starlink Mini Won't Activate? - Troubleshooting common activation issues
- How to Change Your WiFi Password - Set up your network properly
Questions about 12V Starlink power? Our team has helped thousands of Australian travellers get connected. Contact us or browse our complete range of Starlink Mini cables and accessories.